Saturday, July 31, 2010

A Storage Idea All Locked Up

This morning I decided to walk the boys to our local farmers market. It's a wonderful place to buy fresh produce straight from the farmers. Our market even features farms specializing in organic farming practices. Today's purchases were green beans and baby carrots that still had the green tops on. And of course, Adam & Brandon got a gigantic sugar cookie to eat on the way home.

So after this mornings finds, I removed them from my reusable shoppers tote, and got out my storage containers. My trusty Lock N Lock is the topic of today's chatter.  I use Lock N Lock all the time throughout the house. Mainly in the kitchen but also in my craft corner. Adam also will be taking it this year in his lunch box.  I know there are various different storage possibilities (and believe me I have a lot of them, including Rubbermaid & Tupperware), however recently I have been using my Lock N Lock a lot more. 

The reason I love these so much is they are so versatile.  They can go from fridge to freezer, to microwave, and then into the dishwasher.  Besides being the little multi-tasker in storage needs, they are also leak proof. This is the numero uno reason they will be accompanying Adam to school this year. Once the lids are locked down, no spills.  Finally the mention of the lids is the other reason I love Lock N Lock. They are very kid and adult friendly. The snapping up or down of the four sides is easy on the hands for someone who struggles with arthritis. They are also simple enough to open that my 2 year can do it.

At any given time in my fridge you will find numerous Lock N Lock in all shapes and sizes.  Now you can find them at your local grocery store a la carte or you can buy them in sets on QVC. So give these handy little guys a try and see for yourself.

p.s. here's a tip....if you order them from QVC you have 30 day money back guarantee

Friday, July 30, 2010

What inspires you???

A fellow blogger has posed the task of posting a question on our blogs. Her question was, "Why did you start your blog?" My answer is simple, to connect with other people and share what has been useful in my life.  My question is: What inspires you? 

Inspiration for me comes from everywhere and everything.  Post your comments below of what inspires you. You don't have to have a blog to play.  Maybe one of your inspirations will make it to a future post! :o)

My inspiration for today are my boys.

Easy Garlic Knots

On the menu last night for dinner was homemade pizza. Simple enough, I prepared the dough in the afternoon, using Amy Z's recipe (a friend who is very talented and I'm trying to talk her into writing her own blog).  I pulled off a hunk of dough, that I normally split into two small calzones for the freezer. I decided to try garlic knots instead.


When we moved to Oneonta last year, I discovered a pizzeria called Mamma Nina's.  The pizza is New York City style, thin flat slices and very delicious.  They also have an item on the menu called garlic knots.  Apparently, this is popular menu item for central New York.  Jay and I fell in love with these garlic cheesy morsels.  We have tried them from other pizzerias, but Mamma Nina's in my opinion has the recipe down pat.


Moving ahead to my little experiment, I thought how hard can this be? My first job in life was working in an Italian restaurant as a line cook, so I had some skills. For my version of the garlic knots this is how I did it:

  • Pinch off a golf ball size of your favorite pizza dough (if you don't make homemade then use a refrigerated brand or ask your local pizzeria if you can purchase a round of dough)
  • Then start rolling a snake about 5 inches long (this brings back days of making playdough snakes)
  • Tie the dough into a knot and place on an un-greased baking sheet
  • Brush the the knot with olive oil and sprinkle with oregano, garlic powder and mozzarella cheese
  • Bake at 400 degrees for 12 to 15 minutes or until puffed and golden brown
  • When they come out of the oven brush with melted butter
You can substitute Parmesan cheese for mozzarella and use garlic infused olive oil instead of garlic powder.  Experiment and be creative. We also dip them into marina. YUMMY!!

Check out the Places To Go page for information about the Crayola Crayon Factory!

Thursday, July 29, 2010

A Tisket A Tasket A Foot Pampering Basket

This is attempt number three at this post. The first two attempts were sidelined by a two year old who is now napping. I have pizza dough rising for dinner and Amish Friendship Bread in the oven. (I've never tried Amish Friendship Bread, but I'm thinking it will be the subject of a future post)  So today's subject is a gift idea that promises to pamper tired feet.

As a sidebar, I'll quickly try to explain my knowledge of gift baskets.  When I was fourteen, almost twenty years ago (holy moly I am getting old), I wanted to go on a trip with Spanish Club to Mexico. My parents agreed to help with the funding if I came up with a percentage myself. I started doing crafts and selling them at church and school shows. From there I transitioned to making gourmet food baskets. As the years went on I came up with hundreds of ideas for baskets, and my little business was born.

Over the past couple of decades I have literally done thousands of gift baskets.  They are really quite simple and in future posts I will explain specifics. For today I just want to put the idea out there of pedicure gift ideas.  I have done many many "pamper yourself" baskets, but the idea of a pedicure one specifically was brought back to mind almost a year ago.  I was enjoying a pedicure at a spa in Buffalo with my dear friend, and we started brainstorming gift ideas for our families. I thought a gift certificate for a pedicure was great, but then wondered if I would get it for the right place.  So why not a pedicure basket???

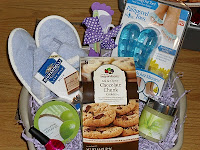
The basket that is featured today has spa slippers, a pumice stone kit, soothing foot gels, a scrub & lotion, and nail polish. I also included a gourmet chocolate bar and cookies.  The "basket" itself is a basin that the recipient can fill with warm sudsy water and enjoy a soak.  The basket is then wrapped in cellophane and tied with ribbons.

Okay, here's the "tricks of the trade" to making a nice pedicure/spa basket. First the "basket" does not have to be a basket. For today I used a basin, aka dish tub (Walmart has them in various colors), that serves dual purpose as basket and foot soaker. Secondly, use nice products. Dont' get me wrong, I love the dollar stores for things like cards, wraps, shred, but when it comes to personal care products go for the nicer ones. (I shop throughout the year when things are on sale and put them in a gift tote.)  Then to fill in space you can always put in a few food items. For this one, I specifically chose treats that could be enjoyed while soaking. Finally, add a personal touch. I happen to know the recipient of this basket and found out her shoe size, so I was able to order spa slippers. This makes it more personal and not so generic.

This idea can be scaled down or super-sized to fit any budget. If you need a gift for under twenty, try a nail polish and nice foot scrub, nestled in a latte mug with their favorite coffee.  For those who want to really impress, instead of the more frugal basin, give a foot spa.  Homemedics makes a nice one for around $30. Also look into Philosophy, they have wonderful body scrubs and foot creams.

Below are a few pictures to help spark your own ideas. Take this one and run with it, get it, run...feet. I know I'm goofy, but I couldn't resist. I am off to taste some friendship bread :o)


lucked out & found a card to match

choose nice brands

Wednesday, July 28, 2010

Lower Sugar Oatmeal Cookies


First I just need to say thank you to the positive repsonse I got yesterday and this morning. It was the encouragement I needed to keep going!


Those who know me can attest that I love to bake and more so, love to consume baked goods. In the last five months I have been trying to find lower sugar versions of my favorite sweets. Back in March we had a scare with my youngest concerning his glucose levels. After weeks of testing and doctor visits, his pediatrician has determined, that right now he's okay. He's still being monitored and will be for a while. I've been educating myself more about type 1 diabetes and about a lower sugar diet. Brandon's doctor has explained to us, that there is nothing we can do to stop type 1 diabetes. That being said, she also helped to educate me on the benefits of a low sugar diet to keep glucose levels more consistent. We have been doing our best making sure all our meals are balanced with protein, veggies, fruits and good carbs. But, Brandon still likes his "treats", so goes my quest of sweets that are kinder to his glucose levels and also taste good.


I have discovered many recipes on the American Diabetes website and also found a cookbook written by Marlene Koch, called Eat What You Love. (That will be the next addition to my cookbook collection.) I borrowed the book from the library and started making recipes and trying them out on the boys. Adam loves the Vanilla Cake Batter Milkshake, and Brandon loves the Chocolate Pudding Milkshake. The book uses Splenda, as it's main substitute for sugar. The preface of the book is wonderful explaining how to use Splenda in your recipes and exactly what to change to make them work.


Yesterday I decided to change my oatmeal cookie recipe to see if there was a difference in taste. After my little helper, Brandon, and I finished baking the cookies, the verdict is: No difference in taste! This was great, sometimes I find the sugar substitutes can give a funny after-taste, but not on this one. Before I post the recipe, I just want to say, it still has brown sugar in it, so it's not a true "approved" diabetic recipe. However the white sugar has been replaced, making it lower in total sugar. The book suggests to leave the brown sugar in tact in a cookie recipe so it doesn't change the texture of the cookie. This recipe is for a basic oatmeal cookie and by all means, if sugar is not an issue in your lifestyle then leave in the white sugar. Also become your own little scientist and change the nuts to dried cherries or change the chocolate chips to cinnamon chips.

lower sugar oatmeal cookies

1 3/4 cups all-purpose flour
1 tsp baking soda
1/2 tsp salt (optional)
1 1/4 cups packed brown sugar
1 cup butter (2 sticks)
1/2 cup Splenda (you can use white sugar)
2 large eggs
2 tbsp milk
2 tsp vanilla
2 1/2 cups oats, quick or old-fashioned
2 cups of add-ins (chocolate chips, nuts, dried fruit, cinnamon chips)


preheat oven to 375 degrees. in a large bowl or mixer cream brown sugar, butter and splenda. add eggs, vanilla, and milk and beat until creamy. slowly add flour, baking soda, salt until just combined. then on low or by hand stir in oats and add-ins. drop by tablespoons onto an ungreased baking sheet and bake for 9 to 10 minutes for chewy or 12 to 13 minutes for crispy. allow to cool on a baking rack and store in an airtight container. Yields about four dozen. tip: every cookie baker i know does this, but it's worth mentioning for the novice, use an icecream scoop for uniform cookies.


Tomorrow I'll give a pampering gift idea!


Tuesday, July 27, 2010

Good Morning All!


Allow me to introduce myself and my little blog. My name is Lisa and I am currently the CEO of the Nowak Corporation. Which is a fancy was of saying stay at home mom and wife. I believe that running a household is a lot like running a company. There are budgets to follow, HR issues (mainly a cranky husband and children), and at the end of the fiscal year, you hope to turn a profit.


Recently I was turned onto a wonderful blog, http://thegourmandmom.wordpress.com/, and have been inspired to share some of my "wisdom", and useful or useless knowledge. When I was fourteen, I started doing craft shows and from there I opened my own gift basket business. I have had numerous jobs over the years, one being working in a very busy floral shop. As I got older my love of cooking and baking came to the surface. Over the years I have picked up some "tricks of the trade" and wish to share them.


I'm not quite sure if there will be any rhyme or reason to the posts. I'll probably tackle the blog the same way I take on life, day by day. I hope to post recipes, gift ideas as the holidays approach, and maybe some general mommy tips that I have found to work with my boys. So check back daily so you don't miss a thing.


I hope you enjoy this as much as I will. Please feel free to email me with your ideas and suggestions.
p.s. please bear with me as I enter into the world of posting and editing